 by
by
Want to Remove Wallpaper Without Wrecking Your Walls or Weekend? Here s How I Did It in Under an Hour
To be completely honest, I used to believe that taking off wallpaper was just another one of those tedious, untidy household tasks that took days to complete. After soaking, scraping, and peeling, you discover that you’re also removing half of the wall.
However, after doing it myself twice and consulting with other do-it-yourselfers, I discovered what most online guides overlook: you can complete the task quickly if you utilize the appropriate technique for the type of wallpaper you’re using and keep your tools basic. Fast, like, less than an hour. No glitzy devices. No damage to the drywall.
I wish I had this guide earlier because it has four tried-and-true techniques that are affordable (less than $50) and won’t ruin your Saturday.
Each one is made for a certain kind of wall and adhesive application. I’ll show you how to determine what you’re dealing with, which approach to take, and what equipment you’ll need—most likely something you already have at home.
Let’s get that wall smooth again in one go, whether you’re remodeling, renting, or simply tired of that old flowery design.
One of these tricks costs less than lunch and has a lavender scent. Stay put.
Know What You re Dealing With Identify Your Wallpaper Type
Determine the type of wallpaper you are working with before you begin to spray, steam, or scrape anything. Just this one step can save your weekend and your walls.
People who use the incorrect removal technique on the wrong kind of wallpaper wind up with ripped drywall, glue residue, or worse, the need to replace the entire space.
To test it, follow these steps:
-
Try peeling a corner
with your fingernail or plastic scraper. If it lifts easily in sheets, it s likely peelable. -
If it resists,
spray a small patch
with warm water and wait a minute. If the water soaks in, it s likely paper-based. If it beads up, you re probably dealing with vinyl or washable wallpaper.
The majority of wallpapers fit into one of these groups:
-
Peelable
: Top layer comes off easily; backing might stay on the wall. -
Strippable
: Removes in one piece without water or steam. -
Traditional glue-based
: Often found in older homes; needs water or steam to break down. -
Vinyl or washable
: Has a water-resistant surface harder to remove without scoring.
Each variety reacts differently to moisture, heat, and tools. You can choose the best approach and prevent wasting time or money on the wrong one by being aware of this up front.
Pro tip: Steaming or scoring is usually the best option if the wallpaper has been painted over because it will be more difficult to remove.
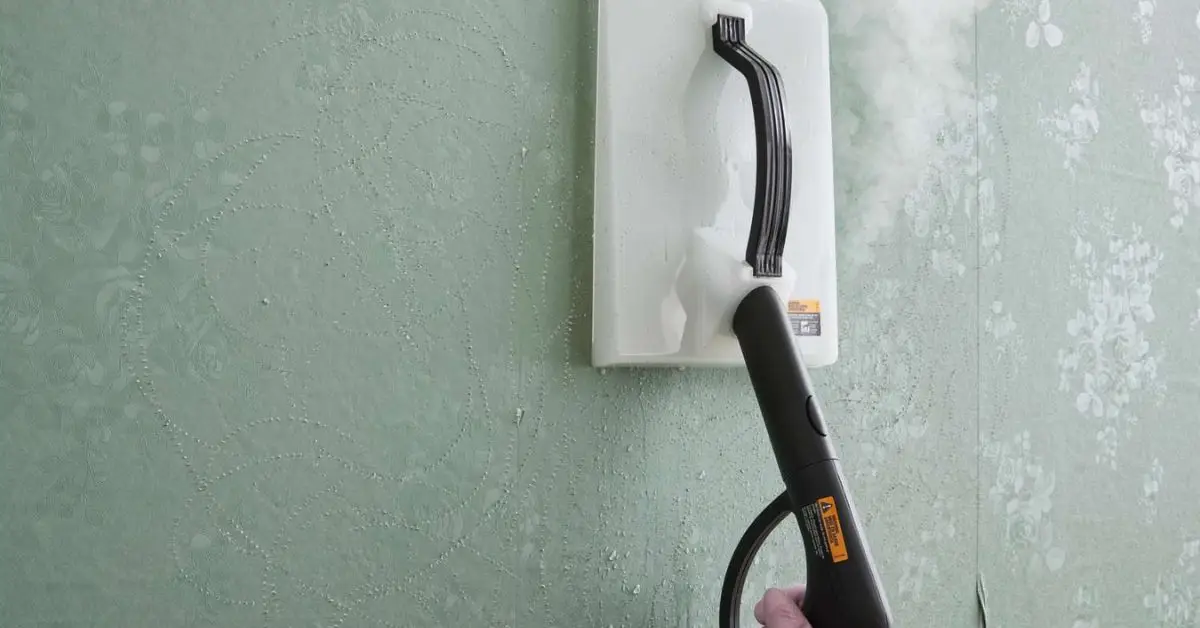
Method #1 The Steaming Hack (Fastest for Heavy Duty Wallpaper)
This is the quickest and cleanest way to remove old, difficult wallpaper or numerous layers, especially in older homes where the glue has been deeply embedded in the wall.
Without using chemicals, a simple wallpaper steamer does the job well. You may rent one from a hardware store for even less money, or you can buy one for about $40. I chose the Wagner 725, which has a wide steam plate that covers a larger surface area without leaving residue and heats up quickly.
This is how it operates:
Important: Avoid over-steaming one area as this may cause the drywall beneath to bubble or tear. Work in reasonable zones and keep moving.
Method #2 The Scoring + Soapy Water Technique (Best for Vinyl or Glossy Walls)
A steamer by itself is insufficient when working with vinyl wallpaper or anything else that is glossy and water-resistant. The cheapest and most efficient method for opening that surface is to use a scoring tool in conjunction with hot, soapy water.
What you will need is as follows:
-
A basic
scoring tool
(around $10) - Hot water + dish soap
- A spray bottle or sponge
- A plastic scraper or putty knife
How to accomplish it:
Typical error: People use the scoring tool excessively. Later repairs may be necessary as a result of tearing the drywall underneath. Let the water handle the heavy lifting and be gentle.
Reddit user tip: Add a little vinegar to your water to help dissolve glue more quickly. This method works particularly well with older adhesives.
If you already have dish soap and a spray bottle, this method is practically free, and it’s perfect if you’re trying to avoid renting or purchasing new equipment.
Method #3 Fabric Softener Formula (Smells Nice, Works Well)
This is for you if you rent or simply detest the thought of chemicals and pungent smells. It is mild and efficient, and while you work, your space will smell wonderful.
The combination:
- 1 part fabric softener
- 2 parts warm water
- Optional: a few drops of dish soap
After pouring it into a spray bottle, do the following:
- Spray a generous amount over the wallpaper.
-
Wait
at least 15 minutes
to let it soak through. - Peel slowly from a corner, and use a scraper if needed.
Pros: Excellent for minor works or one-room renovations, extremely affordable (around $5 overall), and free of harsh fumes.
Cons: Not ideal for numerous layers or painted-over wallpaper; you might still need a steamer or scoring tool.
Method #4 All-in-One Wallpaper Removal Kits (Fastest for Beginners)
The last thing you want is to grab a variety of strange tools and hope for the best if this is your first time removing wallpaper. This is where all-in-one kits come in; they are designed for novices who prefer a straightforward procedure free of extra choices.
The majority of kits consist of:
-
A
scoring tool
-
A
spray-on solution
to loosen adhesive -
A
plastic scraper
- Step-by-step instructions anyone can follow
Popular kits like Zinsser SorDIF are genuinely effective and can be purchased for less than $50. According to This Old House’s hands-on assessment, the Zinsser kit indeed removed sticky wallpaper around 30% faster than ordinary soap and water.
The solution, not just the tools, is what makes these kits effective. It is designed to rapidly dissolve adhesive without causing any harm to the wall underneath.
Warning to newcomers:Not allowing the solution to settle long enough is a common error. After spraying, let it soak for ten to fifteen minutes. This will make scraping much easier and guard against wall damage.
This is by far the quickest alternative if you want a plug-and-play solution that keeps things easy, saves time, and lessens frustration.
What Most DIYers Miss Prepping Your Wall Before & After Removal
To be honest, the majority of individuals immediately start ripping the wallpaper off the wall. That is something I have also done.
But here’s the thing: you’re inviting chaos if you don’t prepare your area in advance or if you neglect the cleanup after removal. Ignoring this process might result in uneven paint, bleed-through adhesive, or even new wallpaper falling off in a matter of weeks.
Before You Start: Protect and Prepare
-
Lay down
drop cloths or plastic sheets
to protect floors - Turn off power to nearby outlets if you re using steam or liquid
-
Remove
switch plates
, cover furniture, and tape baseboards. If you re refreshing wallpaper in an entryway or hallway, it s a great time to also fix
entryway design mistakes
that might be spoiling your home s first impression.
- Have a trash bag nearby the peeled wallpaper adds up quickly
After Wallpaper Comes Off: Clean and Repair
-
Use a sponge with warm water to
wipe away glue residue
-
If you see
wall damage
, fill it in with joint compound and sand it smooth once dry - Let the walls dry out completely moisture left behind is a silent problem
-
Planning to paint or re-paper?
Apply a wall sealer/primer
so your next layer sticks cleanly and evenly
Pro tip: Remaining adhesive might cause issues with paint or wallpaper paste, even if your wall appears clean. Always test by hand to be sure there is still adhesive present if it feels tacky.
The majority of how-to articles drastically hide this step. But really? It’s what distinguishes a spotless, polished surface from a bubbling, uneven mess.
Spend an additional twenty to thirty minutes; your wall will appreciate it.
Budget Breakdown What You Can Do for $25, $35, and $50
Let’s be honest, most do-it-yourself decisions begin with, “Kitna kharcha aayega?”
Additionally, you don’t want to spend too much money on gear you won’t need again because wallpaper removal isn’t something you do frequently. I’ve divided this into manageable budget tiers so you may complete the task according to your expenditure limits. Additionally, you may bug-proof your windows to keep your house cooler and free of pests this summer while you’re already in do-it-yourself mode.
If You ve Got $25
Use the scraping and soapy water procedure.
- Basic scraper ($5 10)
- Dish soap or white vinegar
- Sponge and spray bottle
It is the slowest and least expensive procedure, and it works particularly well for thin or partially peeling wallpaper.
If You Can Stretch to $35
Add awallpaper scorerand try thefabric softener + warm water mix.
- Scorer tool ($10 12)
- Fabric softener ($5 8)
- Warm water spray
It smells better, softens glue faster, and works well on strippable wallpaper. Great for renters or lighter wallpaper jobs.
If You Can Spend $50
Go for anall-in-one removal kitorrent a steamerfrom Lowe s or Home Depot.
- Kits like Zinsser include everything you need
- Steamer rentals usually run around $30 for 4 hours
Best for stubborn wallpaper, multiple layers, or older glue types. Worth it if you want results fast with minimal effort.
Pro tip:If this is a one-time job, renting a steamer instead of buying one can save you money without compromising on speed or quality.
What NOT to Do (Mistakes That Can Cost You More Later)
Here s where a lot of DIYers even seasoned ones mess up. And trust me, these mistakes can ruin your wall, blow your budget, or both.
Avoid these common slip-ups:
Don t yank wallpaper off dry
It s tempting, but pulling without softening the glue almost always leads to drywall damage especially with traditional glue wallpaper.
Don t skip the test patch
Every wall is different. Before going full force, test your method on a small corner it ll tell you how much soak time you need, or if you need a different method altogether.
Don t reuse old scraper blades
Dull blades tear paper unevenly and dig into your drywall. Always use a fresh, clean edge to keep the job clean and your wall intact.
Don t forget ventilation
If you re using any chemical-based solution (including kits), open windows and run a fan. Fumes build up fast in small spaces like bathrooms or hallways.
Best Method by Situation
Not everyone reads every word and that s okay. If you re skimming or trying to make a fast decision, here s a simple cheat sheet that shows which wallpaper removal method fits your situation best:
|
Situation |
Best Method |
Cost |
Time |
|---|---|---|---|
| Thick wallpaper, old house | Steamer | $45 | 45 60 min |
| Vinyl or glossy wall | Scoring + Soapy Water | $25 | 50 60 min |
| Renter-friendly, no chemicals | Fabric Softener Mix | $15 | 45 min |
| Beginner DIY (wants all tools) | All-in-One Kit | $50 | 60 min |
Conclusion: Choose Smart, Act Fast And Keep Your Walls Happy
If you ve made it this far, you already know more than 90% of people Googling how to remove wallpaper.
The biggest takeaway?It s not about effort it s about method.
- Start by identifying what kind of wallpaper you re dealing with
- Pick the removal technique that suits your tools and wall condition
- Don t skip the prep or clean-up it s what makes the difference between a smooth finish and a future repair job
None of these methods require fancy gadgets or a contractor-level budget. You just need theright approach, a little patience, and a plan that fits your wall. Once your walls are clean and refreshed, you can even rethink your decor including where and how to placewall clocks and their placementbased on Vastu tips.
Tried removing wallpaper before?Drop your method (or horror story) in the commentsit might just help someone else figure out what not to do.
Looking for more budget DIY tricks?VisitBuild Like Newfor more practical guides, smart home fixes, and affordable renovation ideas all tested, real, and beginner-friendly.
Disclaimer:The methods and tips shared in this article are based on personal experience, user-submitted hacks, and publicly available product recommendations. Results may vary depending on your wallpaper type, wall condition, and tools used. Always test any removal technique on a small area first.Build Like Newis not liable for any accidental damage or misuse of products. When in doubt, consult a professional.
Table of Contents
-
Know What You re Dealing With Identify Your Wallpaper Type
-
Method #1 The Steaming Hack (Fastest for Heavy Duty Wallpaper)
-
Method #2 The Scoring + Soapy Water Technique (Best for Vinyl or Glossy Walls)
-
Method #3 Fabric Softener Formula (Smells Nice, Works Well)
-
Method #4 All-in-One Wallpaper Removal Kits (Fastest for Beginners)
-
What Most DIYers Miss Prepping Your Wall Before & After Removal
-
Before You Start: Protect and Prepare
-
After Wallpaper Comes Off: Clean and Repair
-
-
Budget Breakdown What You Can Do for $25, $35, and $50
-
If You ve Got $25
-
If You Can Stretch to $35
-
If You Can Spend $50
-
-
What NOT to Do (Mistakes That Can Cost You More Later)
-
Don t yank wallpaper off dry
-
Don t skip the test patch
-
Don t reuse old scraper blades
-
Don t forget ventilation
-
-
Best Method by Situation
-
Conclusion: Choose Smart, Act Fast And Keep Your Walls Happy
-
Before You Start: Protect and Prepare
-
After Wallpaper Comes Off: Clean and Repair
-
If You ve Got $25
-
If You Can Stretch to $35
-
If You Can Spend $50
-
Don t yank wallpaper off dry
-
Don t skip the test patch
-
Don t reuse old scraper blades
-
Don t forget ventilation