 by
by
4 Foolproof Ways to Remove Caulk Without Harming Surfaces
It’s one of those tasks that appears easy until you’re halfway through and you’re looking at stubborn parts that are attached to the tub. I’ve had to remove old caulk more times than I can remember. You risk scratching your tile or leaving residue that destroys your new seal if you rush it.
The good news? You may achieve clean results without causing any damage to your kitchen or bathroom surfaces if you take the proper method. I’ll show you the precise procedures I follow, common blunders people make, and some time- and frustration-saving pro recommendations.
Have you ever attempted caulk removal and found it to be more of a struggle than a task?
4 Key Steps at a Glance
Let me give you the overview before we get started. There are four easy steps that I always follow when removing old caulk. You will feel more assured and avoid being lost in the middle of the task if you are aware of these up front.
This is the short road map:
-
Score
Cut along the edges of the old caulk to loosen it. -
Soften
Use the right method (chemical, heat, or simple household trick) to make removal easier. -
Scrape
Gently lift the caulk without scratching tiles or countertops. -
Clean & Prep
Remove residue, disinfect, and dry so the new caulk sticks properly.
There are only four steps. Let’s now examine each one individually.
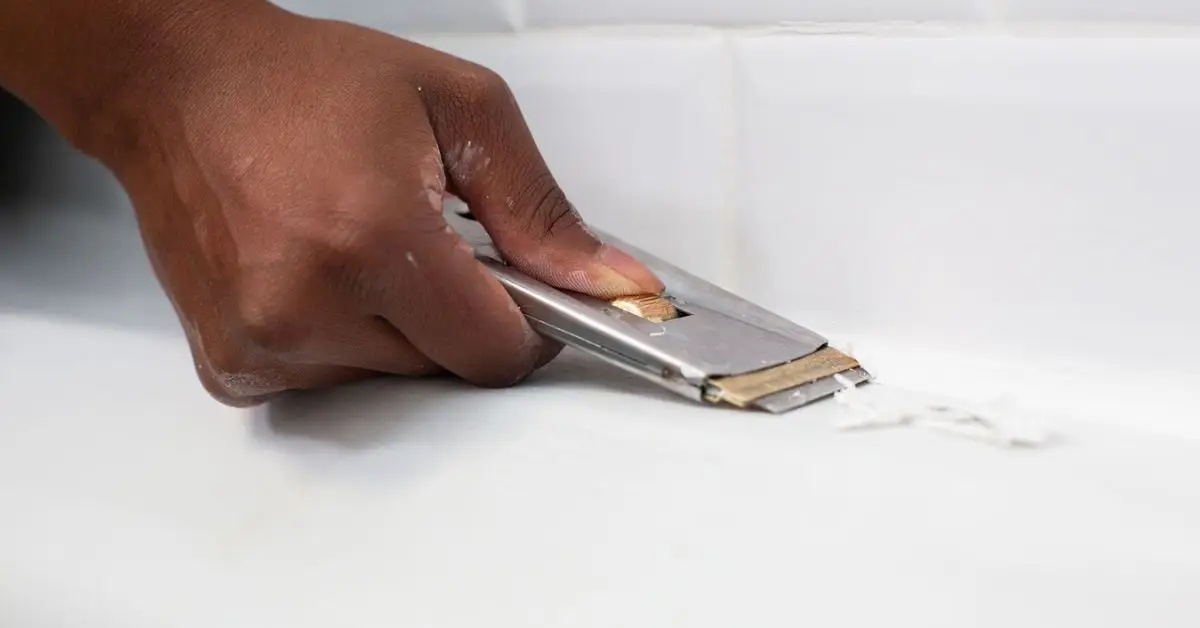
Step 1 Score & Loosen the Old Caulk
I score along the caulk’s edges as my first action. Usually, I use a special caulk removing tool or a sharp utility knife. To begin, carefully run the blade along both sides of the caulk bead where it joins the tub (or counter) and the wall.
Why is this important? Because the caulk begins to peel away much more easily after those edges are broken. You run the danger of tugging too hard and damaging your tile or chipping the surface if you omit this step.
A brief piece of advice:
- Hold the blade at a shallow angle, almost flat, so you don t dig into the surface.
- Work slowly along the seam instead of rushing to cut big chunks.
This small amount of patience up front prevents a great deal of annoyance afterward.
Step 2 Soften It Choose the Right Method
The caulk will still cling obstinately once the edges are trimmed. Softening then becomes important. Your surface and degree of comfort will determine which of the several alternatives you have here is best for you.
The primary ones I use are as follows:
-
Chemical Remover
Products like Krud Kutter can break down caulk, but they need some dwell time. I d use this if the caulk is really old and hardened. Downside: you need to ventilate the area well. -
Heat Tool
A simple hair dryer works wonders. Just warm the caulk gently for a couple of minutes and it softens enough to scrape off cleanly. I ve found this method super safe for most bathroom jobs. -
Soapy Warm Water or Rubbing Alcohol
For acrylic tubs or sensitive surfaces, I stick to mild options like warm soapy water or a cloth dipped in alcohol. They take longer, but they re safer if you re worried about damage.
GE Sealants actually recommends utilizing a hair dryer or heat gun for a mild, efficient softening stage if you want a reliable source.
Scraping becomes nearly effortless when you use the appropriate technique for your surface and prevent needless scratches.
Step 3 Scrape Carefully Without Damage
This is where the majority of folks either lose patience or scrape incorrectly. You will still need a tool to lift the caulk out, but it should peel up once it has softened. I always begin with the option that is the gentlest.
The following tools are typically the most effective:
-
Plastic scraper
My go-to. It s safe on tubs, tiles, and countertops. -
Putty knife
Works if you need a little more pressure, but keep it flat so you don t gouge the surface. -
Caulk strip tool
These are designed for this job and make the work faster if you do a lot of DIY. -
Pliers (with caution)
Sometimes I use pliers to grab long strips, but only if the caulk is already loose.
Here, safety is important. Take your time, put on protective gloves, and leave the amask on for ventilation if you’re using chemical softeners. Rushing causes scratches or chipped tiles that are impossible to cover up later.
Step 4 Clean Up Residue & Prep for New Caulk
Usually, a tiny layer of residue remains even after everything has been scraped off. Although this process may seem tedious, it makes the difference between a fresh caulk line that peels in a matter of weeks and one that lasts for years.
What I always do is as follows:
-
Wipe with a no-scratch pad
to loosen remaining bits. -
Use rubbing alcohol
to remove oils and soap scum that the eye can t see. -
Disinfect with a mild bleach solution
if there s any sign of mold. For stubborn stains or soap scum, I often turn to simplevinegar and baking soda hacks
cheap, safe, and incredibly effective before you recaulk.
-
Rinse and ventilate
the space so everything dries completely.
One tip I learned from a Reddit homeowner was to run a fan for a whole day before caulking, which they claimed made the job appear nearly flawless. I personally tried it, and I must say that it’s revolutionary.
By taking the time to clean and dry, you can ensure that your new caulk will adhere correctly and remain waterproof. These 12 expert cleaning tips will completely change your house if you want your bathroom to seem brand new once the caulk is removed. After the service is done, they will assist you in keeping every area immaculate.
Common Mistakes & Pro Tips (Reader Savers)
To be honest, the most of the terrifying tales I hear regarding caulking revolve around a few preventable errors. These are the major ones:
-
Rushing the job
People scrape quickly or reapply caulk before the surface is dry. That s a recipe for mold growth and early failure. -
Using the wrong tool
A metal putty knife on a plastic tub? You ll scratch it for life. Always match the tool to the surface. -
Mixing chemical and heat methods
If you apply a remover and then blast it with a heat gun, you risk damaging both the caulk and the surface.
Pro tip: your greatest asset in this situation is patience. Never skimp on cleaning and drying, but take pauses if necessary. That’s what distinguishes a do-it-yourself bathroom makeover from something you’ll be pleased with every day.
Fast-Track Comparison Chart: Best Method for Your Surface
You’ve seen the many methods for loosening and removing caulk by now. However, if you are unsure, which one should I pick for my kitchen or bathroom? Here is a brief cheat sheet that I created based on my experience:
| Surface Type | Tool / Method | Best Time to Use | Risk Notes |
|---|---|---|---|
| Porcelain / Tile | Plastic scraper + heat (hair dryer) | When caulk is hardened but surface is durable | Too much heat can crack grout lines |
| Acrylic Tub / Plastic | Soapy warm water or rubbing alcohol | When surface is sensitive and prone to scratches | Avoid sharp metal tools |
| Stone / Granite | Putty knife + chemical remover | When caulk is old and strongly bonded | Chemicals can discolor natural stone |
| Fiberglass Shower | Caulk strip tool + mild heat | For quick removal on curved surfaces | Excess pressure can dent fiberglass |
| General DIY Jobs | Combination (score + scrape) | Everyday bathroom/kitchen recaulking | Patience required don t rush |
Your shortcut is this chart. Simply match your surface and choose the safest approach rather than second-guessing yourself.
Final Value Nugget Ventilation & Prevention Tips
Most individuals overlook the fact that prevention and ventilation are equally as crucial as removal. Your efforts will be in vain if the region is not adequately dried and protected.
The importance of ventilation
-
Keeps the area dry, which
prevents mold
from coming back. - Speeds up drying time so your new caulk bonds better.
-
Makes working with any removers or cleaners much safer. I also recommend investing in a few
smart cleaning devices that ll keep your home spotless with zero effort
, especially in bathrooms and kitchens where moisture can cause recurring mess.
How frequently should caulking be done?
Most bathrooms require new caulk every five years or so, maybe sooner if the area is heavy in moisture, based on what I’ve observed and what homeowners frequently post on websites like Reddit.
I always give these two professional tips:
-
Choose a
mold-resistant silicone caulk
so you don t have to redo the job quickly. - Use painter s tape on both sides of the joint before applying caulk. It gives you clean, straight lines with almost no effort.
- Keep a small fan running during and after the job it makes a bigger difference than you d think.
Better Homes & Gardens has a useful instruction that provides a straightforward, step-by-step method for precisely sealing.
You can avoid years of rework and a lot of headaches by combining the proper goods with adequate ventilation.
Ready to Re-Caulk Like a Pro?
Eliminating outdated caulk is important for maintaining the surfaces you use on a daily basis, not just for making your kitchen or bathroom appear nice. In addition to saving yourself frustration, you’re giving your house a long-lasting finish when you take the time to score, soften, scrape, and clean properly. Too many hastily completed projects have failed within months, but with a little perseverance, the outcome might seem as reliable as one completed by a professional.
How about you? Have you ever attempted caulking and failed, or perhaps discovered a method that made it shockingly simple?I’d love to hear your tale, so please share it in the comments. For further recommendations and step-by-step instructions on how to maintain the brand-new appearance and feel of your house, see Build Like New.
Disclaimer: The data presented here is derived from both generic do-it-yourself techniques and personal experience. Always use the appropriate safety equipment, test on a small area first, and adhere to the product’s instructions. Build Like New disclaims all liability for any harm or damage brought on by using these techniques.
Contents Table
-
4 Key Steps at a Glance
-
Step 1 Score & Loosen the Old Caulk
-
Step 2 Soften It Choose the Right Method
-
Step 3 Scrape Carefully Without Damage
-
Step 4 Clean Up Residue & Prep for New Caulk
-
Common Mistakes & Pro Tips (Reader Savers)
-
Fast-Track Comparison Chart: Best Method for Your Surface
-
Final Value Nugget Ventilation & Prevention Tips
-
Ready to Re-Caulk Like a Pro?