
 by
by
Wallpaper Be Gone: 6 Easy Steps to Steam It Off Like a Pro
Is the wallpaper stuck tightly in some areas and peeling in others? You’re not dreaming. It can seem like a two-step lesson in remorse and patience to remove wallpaper.If you follow the proper procedure and keep an eye out for the typical pitfalls, Steam usually transforms that mess into a neat, manageable task.
I’ll take you through six simple stages in this guide: In order to prepare the wall for paint or new paper, determine whether steaming will work for your paper and wall, prepare the space, set up and use the steamer properly, peel and scrape with the least amount of damage, clean glue and residue, and prime. Just the sensible actions that genuinely save time and prevent errors—no nonsense.
You won’t require a professional toolkit. Most rooms may be cleaned with a wallpaper steamer (or a backup clothes steamer), a scoring tool for tough paper, a firm putty knife, sponges, drop cloths, and gloves that can withstand heat. Do you have those? Alright, let’s begin with Step 1: determining whether steam will remove your wallpaper.
1. Wall & Wallpaper Type Diagnosis
1.1 Identify if wallpaper is strippable or needs steaming
Do a quick test before you even plug the steamer in. Find a loose corner or seam and try peeling it back with your fingers. If it comes off without tearing, you’re lucky to have strippable wallpaper. Steam becomes your best buddy if it resists or tears into tiny pieces. Before deciding to use steam, consider these four tried-and-true methods for removing wallpaper in less than an hour if you’re interested in time-saving removal methods other than steaming. This easy inspection can prevent damage to your walls and spare you hours of needless work, as The Spruce describes in their advice on wallpaper removal.
1.2 Check wall material: drywall vs plaster
More important than most people realize is what’s underneath your background.If you pull on drywall too hard or steam it too much, you run the danger of tearing off the paper backing.Conversely, plaster is more resilient and able to withstand higher levels of dampness. You can determine what you’re dealing with with a fast knock test (solid for plaster, hollow sound for drywall). Knowing your wall type in advance is crucial since unprimed drywall can peel severely when steaming, according to several experienced do-it-yourselfers.
2. Prep Like a Pro
2.1 Furniture, floor protection, power-off
Because it drips, splatters, and can even scald if you’re not looking, steam is a dirty affair. Before you begin, move all of the furniture to the center of the room and cover it entirely. To prevent water from seeping underneath, lay down drop cloths and tape the borders. Yes, turn off the lights and outlets on the wall you’re working on. A few minutes of preparation now can prevent expensive repairs later, as Architectural Digest notes in its home improvement safety tip.
2.2 Positioning a trash bin & drop cloths
The amount of pieces that accumulate as soon as the wallpaper begins to come off will astonish you. To avoid scuffing pristine floors with dripping paper, keep a trash can close at hand, preferably in the middle of the space. Cleaning will go much more quickly if you place a layer of drop cloth underneath your work area to catch any small moist areas you might miss.
3. Smart Use of the Steamer
3.1 Fill with warm water to reduce heat-up time
You can stand around for what seems like an eternity after a cold-water start. Fill the tank with warm tap water rather than cold, as most steamers heat more quickly if you give them a head start. Instead of 10 or more minutes, you will observe the steam increasing just a few minutes. Making that minor adjustment maintains your workflow efficient and prevents you from becoming exhausted before you’ve even started.
3.2 Heat-up & hold steam plate only 10 30 seconds per section
Avoid the urge to cover a large area all at once when the steamer is ready. Working in digestible chunks, roughly the size of a notebook page, is the key.For ten to thirty seconds, press the steam plate flat against the wallpaper.The glue can be melted for that amount of time without soaking the wall underneath. If you steam for too long, you run the risk of distorting the drywall or trapping moisture in the plaster; if you steam for too little, the paper will tear into obstinate little strips. As you labor, you’ll soon discover the sweet spot.
4. Peel & Scrape Technique
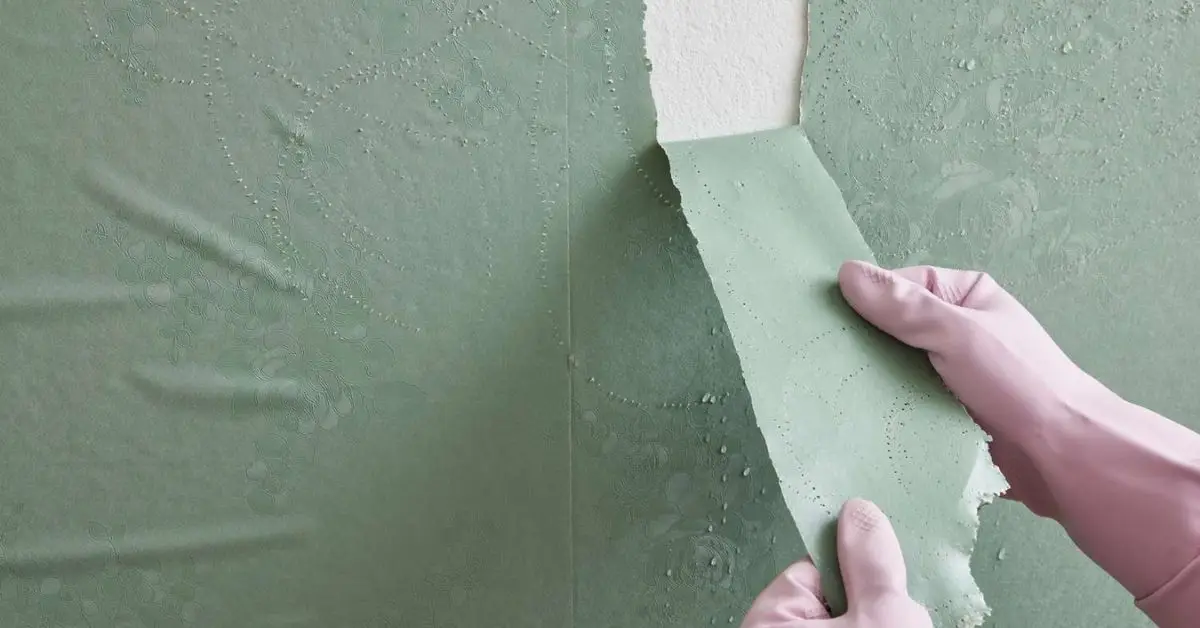
4.1 Start at a bottom seam or lifted corner
Here, gravity can work in your favor. You can get better leverage and frequently a cleaner peel by starting at a bottom seam or any loose corner. Gently slide a putty knife beneath the edge and lift; avoid jabbing or you risk tearing the wall. This method, which was inspired by Decornotes’ wallpaper removal advice, can make removing the initial strip much simpler.
4.2 Alternate steaming top and under layers
The backing paper remains fused to the wall even while the outer layer occasionally separates. To soften the glue from behind, steam the top side first, peel what you can, and then slide the steam plate underneath the loosened section. By alternating between the upper and lower layers, you can avoid becoming trapped in troublesome areas.
4.3 Use putty knife & sponge for stubborn backing
Try the steam again after soaking the paper backing with a moist sponge if it doesn’t budge. The wetness facilitates smoother scraping and helps release dried glue. To avoid shaving the wall underneath the paper, work gently and at a low angle with the putty knife.
5. Glue & Residue Cleanup
5.1 Scrub warm soapy water, or steam then scrape
There is frequently a thin, sticky film that remains on the wall after the wallpaper has been removed. If you leave the adhesive behind, it could leak through paint or produce bubbles in freshly applied wallpaper. Scrub the surface in small areas with a sponge after filling a bucket with warm, soapy water. To remove tough areas, lightly scrape the area with a putty knife after briefly passing the steamer over it. Work on the wall until it feels tacky-free and smooth to the touch.
5.2 Seal or prime wall before painting
Microscopic glue residue may remain even after cleaning. By forming a barrier, a sealing primer prevents paint moisture from reactivating the glue. Additionally, it evens out the porosity of the wall, providing a uniform surface whether you’re painting or applying fresh wallpaper. High-bond primers and other products made for troublesome surfaces are worth the little extra effort to prevent rework in the future.
6. Expert Tips & Avoidable Mistakes
6.1 Use a perforator or scoring tool when wallpaper resists steam
There are wallpapers that are almost armor-plated. Tiny holes are created by lightly rolling a perforator or scoring tool across the surface, which speeds up the penetration of steam through the glue layer. Avoid applying too much pressure as this could shatter the paper instead of leaving a mark on the wall underneath.
6.2 Wear heat-proof gloves, manage steam-burn risk
If you’re not careful, steam can result in immediate burns. To keep the plate steady without flinching, put on heat-resistant gloves. In order to send moisture downward rather than toward your skin, keep your free hand away from the steam route.
6.3 Use clothes steamer or DIY mixture when traditional steamer unavailable
Small spaces can be cleaned with a clothes steamer if you don’t have a wallpaper steamer. An alternative to using chemicals is to directly spray the wallpaper with a solution of warm water and fabric softener, allow it to soak for a few minutes, and then scrape it off. Although it’s not as quick as a steamer, it’s useful in an emergency.
6.4 Avoid damage via patient, slow technique
This is how walls are gouged: rushing. The glue is loosened by steam, but steady hands are still necessary. Use the scraper at a shallow angle, peel carefully, and let the heat do the work. You ll finish cleaner and with less repair work afterward.
Post-Removal Wall Repairs
Once the last scrap of wallpaper is gone, you might notice your walls look tired. Tiny dents, pulled drywall paper, or nail holes are all common.Don t skip this stepfixing these now means your paint or new wallpaper will actually look as good as you imagined.
Start by running your hand lightly over the surface to feel for rough spots. For shallow gouges or small holes, use lightweight spackle and a putty knife to fill them in, feathering the edges so they blend with the wall. If you ve got peeled drywall paper, cut away any loose bits and seal the area with a wall primer before patching this prevents bubbling under paint. Once your walls are smooth, you can give the whole room a glow-up without overspending thesebudget-friendly home upgrades under $200are perfect next steps.
Once repairs are dry, sand lightly with fine-grit sandpaper, wipe off the dust, and your wall will be smooth and ready for whatever comes next. A little extra effort here turnsfreshly strippedintofresh start.
Now It s Your Turn at the Steamer
The funny thing about steaming off wallpaper is that it feels impossible right up until it suddenly gives way and then you re hooked. That first satisfying peel makes you forget the swearing, the prep, and the steam fogging up your glasses. One strip leads to another, and before you know it, you re surrounded by crumpled paper, the walls breathing again, and the room looking like it s ready for a fresh start.
You ve now got the exact six-step process I rely on: diagnosing whether steam will even help, protecting your space, running the steamer efficiently, peeling without damage, cleaning every last bit of glue, and sealing the wall so it s ready for whatever you dream up next. And if your walls are now a blank canvas, take inspiration from theseeasy summer home updates that transform your space on a budgetfresh ideas to make the most of your hard work. It s safe, it s efficient, and it keeps your walls (and your patience) intact.
Now it s your turn what s the most stubborn wallpaper you ve ever battled? Did steam feel like a miracle tool, or did it test your patience to the limit?Share your story or your go-to trick in the comments below. Someone else s nightmare might just become another reader sahamoment.
Want more smart, budget-friendly home upgrades? VisitBuild Like Newfor ideas you can start today.
Disclaimer: This guide is for informational purposes only. Follow all safety instructions and manufacturer guidelines when using tools or steamers.
Table of Contents
-
1. Wall & Wallpaper Type Diagnosis
-
1.1 Identify if wallpaper is strippable or needs steaming
-
1.2 Check wall material: drywall vs plaster
-
-
2. Prep Like a Pro
-
2.1 Furniture, floor protection, power-off
-
2.2 Positioning a trash bin & drop cloths
-
-
3. Smart Use of the Steamer
-
3.1 Fill with warm water to reduce heat-up time
-
3.2 Heat-up & hold steam plate only 10 30 seconds per section
-
-
4. Peel & Scrape Technique
-
4.1 Start at a bottom seam or lifted corner
-
4.2 Alternate steaming top and under layers
-
4.3 Use putty knife & sponge for stubborn backing
-
-
5. Glue & Residue Cleanup
-
5.1 Scrub warm soapy water, or steam then scrape
-
5.2 Seal or prime wall before painting
-
-
6. Expert Tips & Avoidable Mistakes
-
6.1 Use a perforator or scoring tool when wallpaper resists steam
-
6.2 Wear heat-proof gloves, manage steam-burn risk
-
6.3 Use clothes steamer or DIY mixture when traditional steamer unavailable
-
6.4 Avoid damage via patient, slow technique
-
-
Post-Removal Wall Repairs
-
Now It s Your Turn at the Steamer
-
1.1 Identify if wallpaper is strippable or needs steaming
-
1.2 Check wall material: drywall vs plaster
-
2.1 Furniture, floor protection, power-off
-
2.2 Positioning a trash bin & drop cloths
-
3.1 Fill with warm water to reduce heat-up time
-
3.2 Heat-up & hold steam plate only 10 30 seconds per section
-
4.1 Start at a bottom seam or lifted corner
-
4.2 Alternate steaming top and under layers
-
4.3 Use putty knife & sponge for stubborn backing
-
5.1 Scrub warm soapy water, or steam then scrape
-
5.2 Seal or prime wall before painting
-
6.1 Use a perforator or scoring tool when wallpaper resists steam
-
6.2 Wear heat-proof gloves, manage steam-burn risk
-
6.3 Use clothes steamer or DIY mixture when traditional steamer unavailable
-
6.4 Avoid damage via patient, slow technique